Introduction
Laravel MySQL provides a fully managed MySQL database for your application. Laravel MySQL databases are assigned a compute and storage size, but can be scaled at any time. Scale to Zero for Laravel MySQL Flex is coming soon.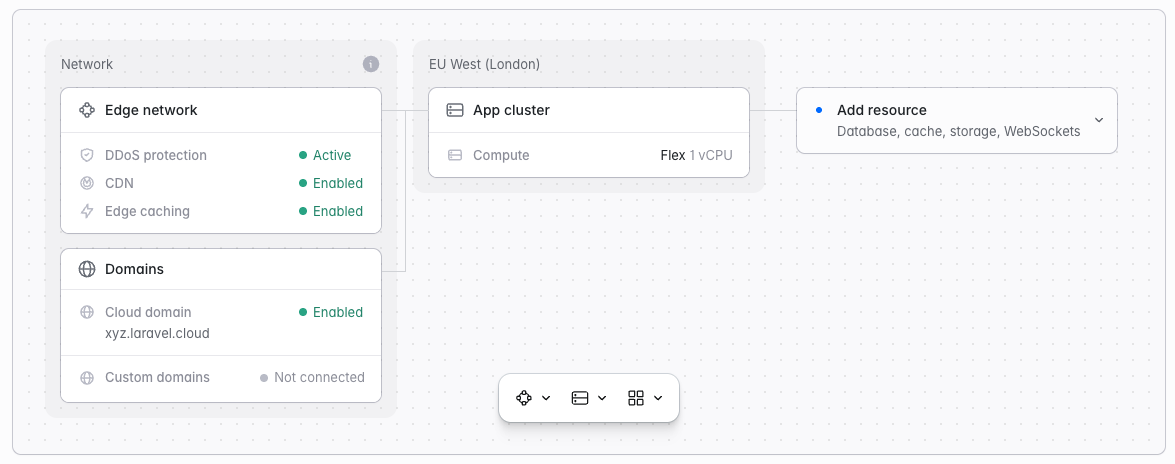
Creating MySQL databases
To create and attach a MySQL database to an environment:- Navigate to your environment’s infrastructure canvas dashboard
- Click “Add database”
- Select an existing database cluster or create a new one:
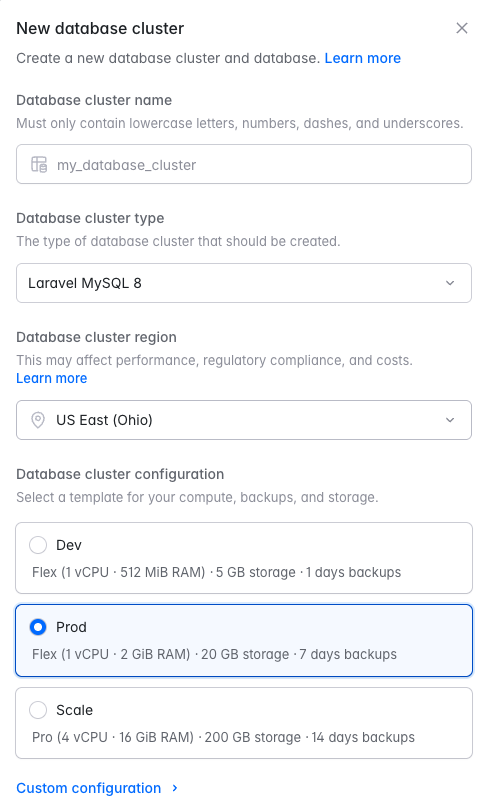
- To create a new cluster: Select “Laravel MySQL” as your database cluster type and configure:
- Cluster name: A unique name for your database cluster
- Instance size: Choose from available compute options (Flex or Pro sizes)
- Storage: Configure storage from 5GB to 1,000GB
- Region: Must match your compute cluster’s region
- To create a new cluster: Select “Laravel MySQL” as your database cluster type and configure:
- Select an existing database within the cluster or create a new one:
- Database name: The name of the database within the cluster
You can also create MySQL databases from your organization’s “Resources” page, but they will need to be attached to an environment separately.
MySQL databases can only be attached to compute clusters in the same region.
Database clusters vs. databases
When creating a new database cluster, you will be asked to provide the desired name of the cluster and the desired name of the initial “database” that will be created within the cluster. Each database cluster can have as many databases as needed within the cluster. In web development, these databases are sometimes referred to as “schemas”. When attaching a database cluster to an environment, you will actually be selecting a particular database within the cluster that you would like to make available to the environment via theDB_DATABASE environment variable used by Laravel.
Editing and resizing database clusters
To edit your database clusters and adjust their compute / storage settings, navigate to “Org > Resources > Databases” and click the ”…” icon for the database cluster you would like to edit or resize. Then, click “Edit settings”.Laravel MySQL storage can only be increased once every 6 hours and cannot be decreased.
Monitoring database cluster metrics
To view metrics such as CPU, write throughput, and storage for database clusters, navigate to “Org > Resources > Databases”, click the database cluster card, and click the “Metrics” option.Deleting database clusters
To delete a database cluster, navigate to “Org > Resources > Databases” and click the ”…” icon for the database cluster you would like to delete. Then, click “Delete” and confirm your action.Importing MySQL data
After enabling your MySQL Public Endpoint, you can use any standard database tools to import your SQL data. For optimal performance, we recommend generating database dumps with the--skip-extended-insert option, especially for smaller Laravel MySQL instances, to reduce memory usage.
Recommended MySQL import tools
The following tool offers efficient and reliable database imports, particularly for larger datasets: This tool supports parallel execution, making it significantly faster than the traditionalmysqldump and mysql commands when handling large databases. Additionally, GUI-based tools like TablePlus can be used for imports. However, be aware that smaller Laravel MySQL instances may encounter memory limitations when using such tools.
Database sizing and performance
Choosing the right database size
Several key factors influence the right database size for your workload: connection requirements, queue workload, backup retention needs, and planned database migrations.Connection limits
The amount of RAM your database has determines how many simultaneous connections it can support:| Server Memory | MySQL Connection Limit |
|---|---|
| 512 MB | 51 |
| 1 GB | 102 |
| 2 GB | 204 |
| 4 GB | 408 |
| 8 GB | 816 |
| 16 GB | 1,632 |
| 32 GB | 3,264 |
All databases are fronted by a proxy layer in Laravel Cloud, which helps multiplex connections for read-only queries, enabling up to 10,000 connections in some conditions. However, writes and transactions cannot be multiplexed—those will count against your MySQL connection limit. Plan your size based on your expected read/write mix.
Queue workload considerations
If your application runs queue workers with a low--sleep interval (such as --sleep=1 or lower), expect high CPU usage. That’s acceptable for development environments, but in production, we recommend a minimum of 2 vCPUs, possibly more for high-throughput jobs.
Backup retention planning
Backups are essential—especially for production databases. If you’re working with a disposable or development database, it’s fine to set the retention period to 0 days. For anything else, we recommend at least 2 days of backup retention for basic protection and recovery.Database migrations and imports
Planning to transfer or import a database? You may need to temporarily scale up your database’s CPU and memory to handle large or fast MySQL imports.- CPU and memory can be scaled up and down easily
- Storage size can only be increased—not decreased—so plan for long-term needs before import
Database backups
Laravel MySQL databases support automated and manual backups.Backup configuration
To configure backups for your MySQL database cluster:- Navigate to “Org > Resources > Databases”
- Click on your MySQL cluster
- Click “Backups”
- Select a backup type:
- Daily backups: Enable automatic daily backups
- None: Disable automatic backups
Backup retention period
If you select daily backups, you can configure the retention period from 1-30 days. Automatic backups occur during a daily 3-hour backup window, scheduled between 3AM and 6AM EDT.Manual backups
You can also create manual backups on-demand from the database cluster’s backup page at any time, regardless of your automatic backup settings.Restoring from backups
Backups restore to a new database cluster rather than overwriting the existing cluster. To restore from a backup, select the restore action from the “Restore backup” section. Next, give the restored database a name and select which backup snapshot you want to restore from. Once the backup has been restored, you will now have two database clusters, the original database cluster and a database cluster restored from the backup snapshot you selected. At this point, you can either detach the original database from your application and re-attach the restored backup, or connect to each database and selectively restore any missing information you might have. When you no longer need one of the database clusters, you may delete it.How to download a backup
Laravel Cloud stores backups as internal snapshots — they are not exposed as rawmysqldump files. To download a copy of your data:
- Restore the desired snapshot into a new database cluster so your production database remains untouched.
- Enable the restored cluster’s public endpoint and copy the credentials (see Connecting to database clusters).
- Use your preferred tool (TablePlus,
mysqldump, mydumper, etc.) to export or download the data to your machine.
Backup pricing
Laravel MySQL backup storage is billed separately from database storage:- Storage pricing:
$0.10/GB-mo(US regions) and$0.12/GB-mo(other regions) - Backup pricing: Billed at the same rate as storage pricing
Connecting to database clusters
From your application
When a database is attached to an environment, Laravel Cloud will automatically inject the environment variables needed by the Laravel application to connect to the database, including theDB_HOST, DB_USERNAME, DB_PASSWORD, and DB_DATABASE variables. You may view these environment variables in your environment’s General Settings.
From your local machine
To connect to your database from your local machine using a database management client like TablePlus, navigate to your organization’s “Resources” page, then to your desired database cluster, and finally click the ”…” icon next to an available database. Then, click “View credentials”.
MySQL public endpoints
Before connecting to a MySQL database cluster, you must enable its public endpoint. From your organization’s “Resources” page, navigate to the “Databases” tab and click the ”…” icon for the MySQL database cluster you would like to connect to. Then, click “Edit settings” and enable the “Enable public endpoint” toggle. Once the public endpoint has been enabled, you may click the ”…” icon next to the MySQL database cluster and click “View credentials”. When you are finished interacting with your database from your local machine, you are free to disable the public endpoint.MySQL SSL connections
To connect to MySQL databases that require SSL, you should add the following environment variable to your application:Database upgrades
Laravel MySQL databases may periodically require an upgrade to stay secure and compatible with our latest features. To check if your database requires an upgrade, go to Resources -> Databases and click the ”…” menu for your database cluster. If an “Upgrade Database” option is present, an upgrade is required. To upgrade your database:- Click the ”…” menu
- Select “Upgrade Database”
- Confirm the upgrade
Maintenance window
For critical security fixes, Laravel Cloud may need to apply updates to your database cluster during its maintenance window.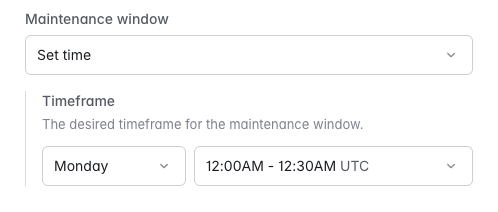
- Click the ”…” menu
- Select “Edit settings”
- Select “Set time” in your maintenance window dropdown
- Select a day and a timeslot (UTC)
Troubleshooting
Common error messages
Too many connections error
Connection timeout error
- If this message appears constantly, confirm you have plenty of disk space and allow 15 minutes for the database to restart after changing disk space limits.
- Check notifications to be alerted before reaching these limits.
- If this message appears occasionally, you may need to increase your database RAM, as the database likely hit an out-of-memory error and restarted during a query or connection burst.
- Contact support if issues persist.
Performance monitoring
Monitor your database performance through the metrics dashboard available in your database cluster settings. Watch for:- High CPU usage: May indicate inefficient queries or insufficient compute resources
- High memory usage: Could lead to connection issues or query failures
- Low disk space: Can cause database failures and connection timeouts
Enable notifications in your organization settings to receive alerts before reaching resource limits.